Paper: Experimental study of leakage and friction of rectangular, elastomeric, hydraulic seals for reciprocating motion from 54 to +135 °C and pressures from 3.4 to 34.5 MPa.
Authors: Nikas, G. K., Almond, R. V., Burridge, G.
Published in: Tribology Transactions, 2014, 57(5), 846-865
Abstract
Hydraulic seals for reciprocating motion are used in
mechanisms, machines and devices most commonly in automotive, aerospace, marine and general industrial
sectors. Applications vary from those of a cheap medical injector and
tire pump to mechanisms controlling ultra-expensive equipment in power
stations, ships and space vehicles. Unfortunately, elastomeric seals are
flexible solids with nonlinear response to changes in their environment
involving stress or strain, heat transfer, interaction with fluids and
aging. Unsurprisingly, research into their performance is ongoing for
more than 80 years. The present experimental study is a step towards a
better understanding of sealing performance in a broad range of
temperatures and sealed pressures. Hundreds of experiments were
conducted in conformance to international standards and in controlled
conditions within tight tolerances of all parameters, including
mechanical properties, solid dimensions and operating conditions.
Rectangular elastomeric seals for aerospace applications were studied
under sealed pressures of 3.4 to 34.5 MPa (500 to 5000 lb/in2)
and in ambient temperatures of 54 to +135 °C.
The combined range of pressures and temperatures exceeds what is
available in the literature, particularly on the low temperature side.
Other parameters varied in the experiments include the seal dimensions
and radial interference, the surface roughness of the cooperating
shafts, and the support of seals by one or two back-up rings. The
results of the parametric study, summarized in 8 tables and 2 figures,
have been sorted for ascending leakage and friction force at each of the
studied ambient temperatures for quick selection of optimal values.
Some figures and details from this work
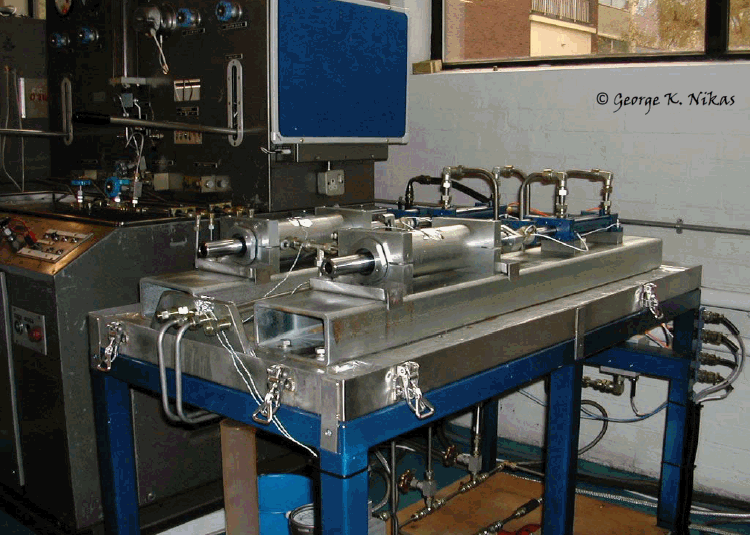
Figure 1 shows part of the seal test rig installation as well as the servo control and data recording used in the experiments. This equipment was used to perform 344 endurance tests of 1000 cycles each during a period of five calendar months. The seals were made of low nitrile compound NBR suitable for aerospace applications. Two cycling rates were used, namely 0.2 Hz and 0.5 Hz, with 40% rod duty cycle. Tests took place at 54, +23 and +135 °C. Sealed pressures were 3.4, 20.7, 27.6 and 34.5 MPa (500, 3000, 4000 and 5000 lb/in², respectively). Hollow, through rods of 31.7 mm outer diameter were used in the rig, manufactured from S99 high strength steel. They were fully heat treated and chromium plated to provide a wear resistant surface and adequate corrosion resistance. Two grades of rod average surface roughness (Ra) were used: 0.2 to 0.4 micrometres as well as 0.05 micrometres (superfinished) to cover most industrial and aerospace applications. The glands, manufactured from actuator bearing material, were machined to produce maximum and minimum seal squeeze conditions per SAE AS4716. Thus, initial radial seal interference covered both minimum and maximum values per SAE AS4716. The rod-gland radial clearance was kept between 19 and 23 micrometres by match-grounding rods and glands before the tests. All combinations with 0, 1 and 2 PTFE back-up rings have been tested, resulting in 8 rod-gland configurations. The petroleum based hydraulic fluid used in the rig conforms to DEF STAN 91-48/2 (Defence Standard). The axial displacement of the rods was 102 mm and the stroking velocity 102 and 254 mm/s (4 and 10 in/s, respectively). The rig was enclosed in an insulated environmental chamber. Temperature was measured by thermocouples close to the seals and used to regulate ambient conditions in the environmental chamber, which were changed by the supply of conditioned air. Seal leakage was collected in trays under the test vehicles before being weighed and friction was measured by load cells.


Fig. 1. Seal test rig installation (top picture); servo control and data recording (bottom picture).
During the tests, all measurements were made with test equipment carrying a valid calibration label. The accuracy of the calibration conformed to specific requirements of the seal manufacturer (Smiths Aerospace). The maximum allowable tolerances for conditions applied to test units were as follows: temperature: ±2.5 °C; pressure: ±2% of reading; time: ±2% of elapsed time; load, displacement and velocity: ±2.5% of reading. The accuracy of test instrumentation for temperature, pressure, load, displacement and velocity was within ±2.0% of reading.
Prior to testing, the following data were measured and
recorded.
(a)
Seal specimens: size (full
dimensional check, weight and volume).
(b) Piston rods: diameter,
roundness, surface finish and texture over the stroking range.
(c) Test vehicle glands:
groove sizes (full dimensional check) and piston rod bearing/relief
diameters.
(d) Test vehicle assembly and test: following piece part dimensional inspection, the test vehicles were wet assembled in a clean area to drawing requirements including all torque tightening. They were then static pressure tested using clean DEF STAN 91-48 hydraulic fluid at 69 kPa (10 lb/in2) for 5 minutes.
Acceptance tests prior to endurance tests were performed as detailed in the article. For details and results, please refer to the published paper.